Saturday, December 26, 2009
Pillowcases coming soon!
I took pictures for a step-by-step tutorial of some easy pillowcases on Christmas Eve. Then on Christmas morning, David grabbed the camera, saw that the memory card was full and erased a bunch of pictures, starting with the pillowcases. >:-( So I will be adding that tutorial when I get another pillowcase made, which should be this week. My 6 year old, Jenna, has been asking for one made out of some frog fabric forever.
Thursday, December 17, 2009
Peppermint Bark Popcorn

This recipe came from the girls at Our Best Bites and it is seriously good. I made it last year and it was a huge hit. I give it two thumbs up!
Caramel Popcorn
Today marks the first day of Christmas Candy making for me. I have a whole list of things to make and am going to be posting the recipes as I go. Yay!


Combine the butter, sugar, corn syrup and salt in a 2 qt. sauce pan. You definitely don't want to use anything smaller. Cook it over medium heat, stirring occasionally, until it is melted. Bring it to a boil and then boil it for 5 minutes, stirring constantly. It will look something like this:

Remove from heat and add the vanilla and baking soda. Stir it really fast as it will foam up. Pour that over the popcorn and stir it up to coat the popcorn. You don't have to worry about coating it too evenly it at this point.
Bake at 250 for a total of about 45 minutes. Take it out in 15 minute intervals and give it a good stirring. It will continue to even out the coating as you do so. And be sure to set your timer each time! My mom has a terrible habit of never setting the timer and I learned that from her. Luckily, my husband helped me break free of that.
Spread two big pieces of waxed paper on your counter. After your 45 minutes are up, stir it up one last time and then spread it out on the waxed paper to let it cool.
If today had a theme, it would be popcorn. I bought a popcorn popper at Walmart just for the occasion! I love it already! I started with the caramel popcorn.
Ingredients:
1 1/4 c. popcorn kernals -This was two and a half batches in the popper. If you don't have a popper, you could use microwave popcorn. You'd probably need three bags or so.
1 c. butter
2 c. brown sugar- I love dark brown sugar instead of light.
1/2 c. light corn syrup
1 t. salt
1 t. vanilla
1 t. baking soda
Preheat your oven to 250.
Spray a big roaster pan with cooking spray. Then pop your popcorn right into it.
Combine the butter, sugar, corn syrup and salt in a 2 qt. sauce pan. You definitely don't want to use anything smaller. Cook it over medium heat, stirring occasionally, until it is melted. Bring it to a boil and then boil it for 5 minutes, stirring constantly. It will look something like this:
Remove from heat and add the vanilla and baking soda. Stir it really fast as it will foam up. Pour that over the popcorn and stir it up to coat the popcorn. You don't have to worry about coating it too evenly it at this point.
Bake at 250 for a total of about 45 minutes. Take it out in 15 minute intervals and give it a good stirring. It will continue to even out the coating as you do so. And be sure to set your timer each time! My mom has a terrible habit of never setting the timer and I learned that from her. Luckily, my husband helped me break free of that.
Spread two big pieces of waxed paper on your counter. After your 45 minutes are up, stir it up one last time and then spread it out on the waxed paper to let it cool.
Monday, November 30, 2009
Recovered Folding Chairs
This is the ugliest chair ever. My uncle fished it out of a dumpster at my church several years ago and I have been using it at my sewing table ever since. I don't know why it never occured to me before, but I got the briliant idea to recover it!

So several coats of spray paint and some new fabric later, wah-lah!

So several coats of spray paint and some new fabric later, wah-lah!

And the best part? I have three more just like it waiting to be given a face lift! Should I make them the same fabric or should I mix it up a bit?
Wednesday, October 28, 2009
Cake Pops!
What's more fun than cake on a stick? Oh, I know. It's cake on a stick and then dipped in chocolate!

Then add your frosting and mix it up well. Note: You don't have to have a whole cake. This would be a perfect way to use up cake leftovers. Just add frosting a little bit at a time to get it to the right consistency.
Then roll them into balls, whatever size you want is fine. Mine were probably about 1 1/2" in diameter and I liked that size. Place them on waxed paper and pop them into the freezer for an hour or two. At first, I put them in the fridge, but I found that they softened up too much, too quickly. So a trip to the freezer made them all better.


I first tried these several years ago, but without the sticks, so they were just cake balls. Then along came Bakerella, (I love her, btw) and I'm not sure if she added the stick or what, but she pretty much made them famous. She even went on Martha Stewart and made them.
I am a show off, what can I say? I wanted to make something impressive to take to our church's Trunk or Treat, so I decided on these.
To make them, you'll need:
1 cake, baked and cooled - 9 x 13 is perfect
1 tub of frosting (or an equivalent amount of homemade)
Almond bark or candy coating discs (I used orange ones from Wilton's and chocolate Almond Bark)
Lollipop sticks
Styrofoam
Start by crumbling your cake into a big bowl, like so:
Then add your frosting and mix it up well. Note: You don't have to have a whole cake. This would be a perfect way to use up cake leftovers. Just add frosting a little bit at a time to get it to the right consistency.
Then roll them into balls, whatever size you want is fine. Mine were probably about 1 1/2" in diameter and I liked that size. Place them on waxed paper and pop them into the freezer for an hour or two. At first, I put them in the fridge, but I found that they softened up too much, too quickly. So a trip to the freezer made them all better.

Then the fun part! Melt your chocolate however your package tells you to (I used the microwave) and stick a stick in them. Dip it in the chocolate and swirl it around to make sure you get it good and covered. Let the excess drip off and then stand them up in the styrofoam to let them harden.
The final thing I did was to put some of the coating in a zip lock bag and snip off a tiny bit of the corner and pipe some swirls on the top. Oooh, la, la! They are fancy now! I actually had wanted to make jack-o-lantern faces out of fondant, but 1) I only bought one package of orange coating and it didn't make that many and 2) I had sewn Superman's belt, Alice's apron and run six miles that day and was ready to just be done already. So the swirls looked great and were fast and easy.
Voila! Cake pops!
Friday, October 23, 2009
Jeans Into Tiered Skirt
 My six year old is going to a birthday party tonight and she needs a gift. My plan was to go to Walmart today and get one for her to take, but then I went into my laundry room and saw the three pairs of jeans that have been sitting there for two years, just waiting for me to make something with them. An idea to save me $20 was forming...
I started by cutting the legs and crotch out of one pair, like so.
 I chose some pretty lightweight courderoy to make the skirt out of. I used the whole width of it for the first tier, so it measures 19 x 7, cut on the fold. Then I used two pieces of 24 x 9 for the bottom layer. In retrospect, it would've looked better with a fuller bottom layer. I should've done the whole width of the fabric for each of the two pieces, but with the same 9 inches in length that I did use.
The next step was to sew the two short edges together on the bottom layer and then hem it. I did a basic rolled hem. I avoid iron and pinning at all costs, so I've gotten pretty good at just rolling and sewing as I go. This is about 1/4" folded up and then folded up again. If you want to iron and pin, be my guest. Do the same thing with the top layer of fabric, on the top edge if your fabric has a top and bottom to the print.
 Next, I needed to gather the top edge of the bottom layer, so I turned up the tension on my machine and used the widest stitch I could to baste it. Then I was able to pull on the bobbin string and adjust it to the width I needed it.
I found the middle of the top layer and pinned the seam of the bottom layer to it to keep it even. Then I was able to shift around the bottom until the edges lined up and it was all even. Then I used my serger to sew the two pieces together. Make sure you have the right sides together.
If you don't have a serger, just zig zag it and then go back over the edge with an overcast stitch to finish the edge.
Then you'll need to line up the outside edges and sew the skirt into a skirt. Here we again have the serger or overcast option.

Then sew a basting stitch on the top edge of the top layer and pull it in so that it will fit around the bottom of the jean body.
I finished the bottom edge of the jeans with my serger, but again, you could use a zig zag or overcast stitch if you don't have a serger.
 Use lots of pins to attach the skirt to the jeans and be careful to make it level all the way across. I ended up picking some of it out and straightening it out. Oh, how my disdain for pinning comes back to bite me sometimes.
Finally, I made some cute clips out of fabric yo-yo's, using this tutorial. I covered the alligator clips with ribbon and then glued the yo-yo's to the middle. I love them!

Unfortunately, I don't have anyone to try the skirt on right now since Jenna, my 6 year old, is at school and I won't be home when she gets home and goes to the party. I tried to get Jack to try it on, but he just wouldn't!
Thursday, October 22, 2009
Superman Felt Applique
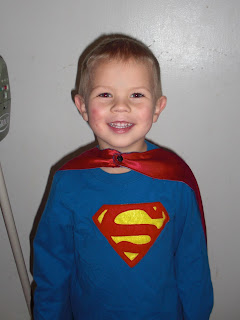
This is my buddy, Jack. His is three and boy, through and through. I made him a superhero cape for Christmas last year and he wears it all the time. He decided that he wanted to be Superman for Halloween this year and rather than spending a ton on a cheap costume, I wanted to make him a shirt that he could keep wearing after Halloween was over.


I starting by drawing a design on paper and cutting it out. I cut red and yellow felt into the shield design first and then pinned the design to the red felt. I tried using an X-acto knife to cut out the cutouts, but then realized that it was easier to just use super sharp sissors.
After it was cut out, I used Tacky Glue to glue the two pieces together. I don't know if that was really necessary since I was going to sew them together anyway, but it made it not slip around at all and I didn't have to pin it.
The last step was just sewing it to the shirt. Easy peasy.
Thursday, September 17, 2009
Repurposed Baby Shoes
This project started out as one of necessity. Well, maybe not necessity because what baby actually needs shoes, but I wanted London, my five-month-old, to have some shoes but her feet are so tiny that I couldn't find any already made that fit her. Even the newborn sizes were too small. So I decided to make some.


Side track: I love garage sales. I have just recently started going to them and trying to see potential in all the junk/unwanted stuff out there. I went into one of the thrift stores in town looking for a leather purse that I could cut up for the leather for the shoes. I couldn't believe it when they wanted nine dollars for a leather purse. I tried to talk them down but they wouldn't budge.
A few days later, I found this beaut at a garage sale for fifty cents. Take that, Rainbow's End.
I bought this pattern because it had ten sizes and got busy sewing. Since I was using leather, I didn't line them. The leather is soft enough inside.
I also bought a pack of leather needles, but I think that might have been a waste of $5 because after I got them home, I realized that they are just a size 90/14, which I found in a multi-pack in my sewing table.
Don't you love them?! They are so tiny!
That lit a fire in my pants and I have been on the lookout for cheap leather purses ever since. I went into other thrift shop in town looking for purses and found their prices to be reasonable. (I live in a town with 4,000 people and two thrift shops.) I think I hit the jackpot when I found these pants for $2!
Using the same pattern and felt for a liner, those hideous pants became these sweet little shoes.
These ones are actually for my next door neighbor's baby who is five days older than London. We have been trading my sewing skillz for babysitting my two kids so I can exercise. I love it!
Wednesday, September 16, 2009
Repurposed Oatmeal Can
I love buying things in bulk, but then there's the ever challenging question on what to do with the rest of it once you open it. I used about 1/2 cup out of this 4 pound bag of pintos. Sooo, upon digging around in my laundry/storage/back room, I found an empty oatmeal container. (I am becoming my mother in that I have a problem throwing containers away. Just last night, I took dinner to our missionaries in two cool whip containers.) Anyhoo, it looked like a perfect fit for my beans. 

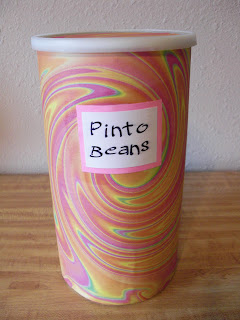
I have recently become enamored with Mod Podge. I have been seeing it being used all over and it is really cool stuff! So with two pieces of scrapbook paper and my crazy glue, I fixed up this canister. I also dusted off my stamps and made a label.
Who cares that it will just be sitting in my back room where no one will see my handywork. I won't ever get it confused with quick oats!
Thursday, September 10, 2009
Getting Started
I am a food and craft blog-aholic. I have so much fun reading them and I end my sessions feeling so inspired, hence the name of this blog, Gotta Try That. I can't wait to share all of my ideas with the blogging world and also show you my versions of things that I've seen out there!
Subscribe to:
Posts (Atom)
